Monday, 26 August 2013

Kitchen Fun! Making frothy gels from vinegar and Gaviscon


Here’s a fun experiment for your kitchen, with safe ingredients from the supermarket and a surprising result. You will need: 


  • Gaviscon liquid, a common treatment for heartburn
  • Vinegar (I’ve used 5% acidity distilled vinegar, but anything should work)


All you have to do is mix 1 teaspoon (5ml) of Gaviscon liquid with 3 tablespoons (45 ml) of water and stir to disperse the Gaviscon into the water. Then, add 1 teaspoon (5ml) of the vinegar and immediately stir the mixture for a few seconds. 

You get an incredible change – within a few seconds, the watery liquid turns into a squishy lump of gel! Over the next minute or so, bubbles form and the gel expands slightly. The gel is quite stiff, but quite easy to break apart with your fingers. It was quite difficult to get out of the cup, since the gel is slowly expanding and gripping the sides. It also tastes quite good, but I should probably recommend that you don’t try that…


What’s going on? I’m not going to let you get away with having fun without learning something, so let’s delve in.

Gaviscon is a treatment for heartburn, which is often caused by stomach acid getting into the wrong place. The main ingredients in Gaviscon are sodium bicarbonate and calcium carbonate, which are both bases. They react with the excess stomach acid to neutralise it (which is why it relieves the heartburn), producing salts, water and CO2 gas.  Our vinegar is acting in the same way as the stomach acid, which explains where the little bubbles in the gel come from – they are CO2 generated from the acid+base reaction.

But what about the gel? The other main ingredient apart from water in Gaviscon is sodium alginate, a water soluble polymer extracted from seaweed. Gaviscon is a rather thick liquid, and this is because the sodium alginate polymer chains get tangled up with each other in the liquid, making it harder for the whole thing to flow.

The “-ate” ending in name of sodium alginate tells us this is a salt. That is, the product of an acid+base reaction itself. In this case the parent acid is alginic acid, which has lots of acid groups all along the length of the polymer chains. In the alginate form, these acid groups have a negative charge (as COO-) which helps keep them apart since like charges repel, and stops them getting too tangled. When we add the vinegar, which contains acetic acid, we get another acid+base reaction: sodium alginate + acetic acid --> alginic acid + sodium acetate. Alginic acid no longer has these negative charges (the COO- groups get converted to COOH) and the polymer is no longer very soluble. The polymer chains get strongly bonded together, forming a network throughout the liquid with the water trapped in between the chains. This is why we get a gel! This is probably what also happens in your stomach when you swallow the liquid, helping the Gaviscon to coat and stick to your insides.

You can also do a fun (and messy!) experiment to optimise the amount of Gaviscon and vinegar in the gel, but I’ll report on that in a separate post.

In my real job, I also play with polymers with solubility that depends on pH in the same way as sodium alginate. We've used these polymers to coat particles to produce pH-responsive suspensions, conduct fundamental studies into the swelling of thin films using several different analytical techniques, create sensors and study surfactant assembly.

Enjoy!

Footnote to fellow chemists; I think I’m right about the mechanism here. The pKa of the alginate acid groups is 3.4 and 3.7, as reportedby FMC BioPolymer. The pH of vinegar is apparently about 2.4, and I’m diluting by about 10x, which should give a pH of 2.9, enough to deprotonate the alginate. There could easily be something else going on here though – alginate also gels in the presence of calcium, which is definitely present in the calcium carbonate. Acetic acid + calcium carbonate gives calcium acetate, which would presumably dissolve and also gel the alginate?

Monday, 1 July 2013

Fewer brick walls and more warning signs: teaching students about the limitations of models


A complaint I occasionally hear from science and engineering students at university (and often see expressed online) is that every higher stage of education brings the revelation that things they knew before were "wrong" and this old knowledge is to be replaced by new ideas and models. The students seem to get frustrated with science because of this, become distrustful of their teachers, and ultimately might become turned off to further study in the field.

In some cases, this hierarchy of models feels natural, does no harm and serves everyone well. For example, much of basic chemical structure and bonding can be explained by assuming electrons are little charged orbiting balls being swapped or shared in bonds. Once quantum mechanics is invoked, students get the fuller picture and can explain more phenomena, but the 'little charged balls' model remains useful – even at the highest level, organic chemists still 'push electrons' around!
Image: Pumbaa/Greg Robson - wikimedia commons

However, in many cases, using simple models without warning the students about the limitations of these models causes trouble. I most often see this in online discussions or question-and-answer forums where non-experts ask scientific questions. People often have very "black and white" ideas about how the natural world works, when the truth is the many shades of grey. This all-or-nothing thinking leads people to contradictions, frustrations and misunderstanding, which could have been avoided if the questioner had been properly told the limitations of their model in the first place.

A good example: a questioner wants to know what will happen if they fill a thick metal container up to the brim with water, seal it and freeze the water in their freezer (of course, I know can’t find the original question, but here are a couple of similar examples). They know that water expands when it freezes, but they have also been told that liquids and solids are incompressible (whereas gases are not). This forms a frustrating contradiction: how can the water freeze and expand, if it's got nowhere to expand to? There is also an implicit assumption, that the water will actually freeze in their freezer. In fact, depending on the wall thickness of the metal container, the water will either freeze and cause the container to expand (or break!), or the pressure in the vessel will get so high that the freezing point of the water is depressed, and it will not freeze.

Had the student been properly told in the first place that solids and liquids "can be assumed to be incompressible" and that freezing points can vary, the student might not have been able to solve the problem, but it may remove the contradiction and confusion.

When teaching at university, especially on the foundation course, I like to make it very clear to students when I'm making an assumption which might get overridden at higher levels. This "but you don't need to know that..." approach could be seen as patronizing to the students (and I have been warned off this by at least one colleague), but my approach is not to "wall off" areas of the subject and tell them not to go there, but more like erecting warning signs and hazard tape around it: "only go there if you're happy to learn something more complex and difficult (which won't be in the exam!)". I give students the terms to search for if they want to know more, in clearly marked "advanced topic" boxes. While this may seem unsatisfactory at the time, I believe it will be more satisfactory for students (who don't get the feeling of being lied to) and teachers (who don't have to lie). I’m sure there is some established pedagogical language around this, but I think of it as 'meta-knowledge': some knowledge about the limitations of the knowledge they are being taught.

In an age when nearly every student carries a smart phone in their pocket, and can look up the deeper details in a few seconds of any topic that piques their interest, I would encourage educators to erect a few more "warning signs" and a few less "brick walls". 

Image: Eugene Zemlyanskiy - flickr

Saturday, 16 March 2013

Scientists sound boring! Quantifying the 'monotone'

I read a blog post by Alan Mars last week about the excellent Material World science programme on BBC Radio 4, complaining about how all of the scientists interviewed on the show had such boring voices. Alan says,
"Sadly most of the interviewees speak within a very narrow band of auditory frequencies. Monotone in common parlance. It sounds as if the scientists vocal "loudspeakers" are turned in toward their body, rather than outwards towards a public that is thirsty for the latest news."
It doesn't help my scientific colleagues that the show's host, Quentin Cooper (hard at work in the studio, left, picture by bowbrick on Flickr), speaks in such an animated and engaging way.

Listening to the Material World podcast with Alan's quote in mind, the contrast between Quentin's delivery and that of the scientists was unmistakable. The differences become even more stark after a frequency analysis with Audacity.

The vertical axes in these plots are the pitch of the speaker's voice, and the horizontal axes time. The plots were produced using Audacity's EAC autocorrelation function to extract the pitch of the voice. I won't tell you which episode this is!


Here is Quentin (the host), introducing a show:


and here's the (male) scientist on immediately after:

The 'monotone' is striking!

Here's another bit of Quentin (this time as a Fourier transform frequency/time plot):


and here's the (female) scientist on next:


Flat as a pancake - it's not just the men who have a problem!

When we're training new lecturers, "don't speak in a monotone" is one of the first pieces of advice, followed by the trainer demonstrating a comedic robot-like example of a monotone speaker. However, it's clear that even when a scientist is putting their best foot forward (presumably, since they're on national radio!), they are clearly still speaking in a relatively monotonic voice compared to radio-trained voices.

I'm convinced that a bit of variation in speaking pitch and volume is one of the main factors which determines whether students perceive a lecture as boring or interesting, not necessarily what you're actually saying!

Tuesday, 11 January 2011

Co-nonsolvency; or, When are Solvents not Solvents?


Imagine you had a solution of a compound in a good solvent, and you slowly added increasing amounts of a liquid that is not solvent for the compound – what is likely to happen? Unsurprisingly, when some amount of the non-solvent has been added, the compound will no longer dissolve and will start to come out of solution. The now undissolved material could appear as a solid precipitate, or as droplets or a liquid.

A good example of this process is the Greek alcoholic spirit Ouzo. Spirits are typically 40% ethanol (by volume), with the rest being water. Small amounts of the compounds which give the drink it's flavour are dissolved in this ethanol/water mix.

In the case of Ouzo, dissolved trans-anethole contributes to the distinctive aniseed flavour. Trans-anethole is more soluable in ethanol than water and there is just enough ethanol in Ouzo to keep it dissolved. What happens if we add more water (the non-solvent) to the mix? It causes the drink to become cloudy as the oils come out of the solution (the Ouzo Effect)[1,2]. In fact, this is the traditional way to drink Ouzo! The video below by 1univ1 demonstrates the effect perfectly.


Now, imagine that you had a compound that was soluble in both ethanol and water. If you had a solution of this material in ethanol and slowly added water, you would expect it to stay dissolved. Indeed, this is normally the case – nothing precipitates out when you add water to a whisky/whiskey for example.

One Whisky
Adding water to whisky - photo by Lee Carson on Flickr

However, with some polymers this is not always the case. For example, a polymer called PMPC (poly(2-(methacryloyloxy)ethyl phosphorylcholine)) dissolves in water, dissolves in ethanol, but does not dissolve in a mix of water and ethanol – strange! This effect is called co-nonsolvency. In fact, many polymers can show co-nonsolvency if you choose the right pair of solvents. For common polymers, these solvent pairs can be quite exotic; polystyrene shows co-nonsolvency in dimethylformamide (DMF) and cyclohexane[3]. PMPC is an exotic polymer, containing a chemical group found in cell membranes called phosphorylcholine, but displays co-nonsolvency in pairs of very common solvents: ethanol and water, and isopropanol and water.

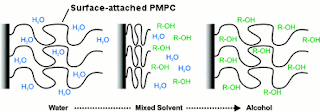
The reasons for co-nonsolvency are complex, not very well understood, and likely to be slightly different for different polymers. But it essentially boils down to this: in the mixed solvents, molecules of the two different solvents (e.g. ethanol and water) would rather associate with each other than with the polymer. For something to dissolve, it needs to be associated with solvent molecules, so the polymer does not dissolve in the mixed solvent. 

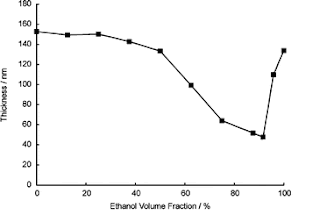
In our recent paper[4], we study a layer of PMPC which has been attached to a surface, rather than free polymer which can be dissolved or precipitated. Due to the surface attachment, we have to study co-nonsolvency by watching the thickness of the layer. When the layer is in a good solvent (pure ethanol or pure water), it takes up lots of solvent and swells, becoming thicker. In a bad solvent (the ethanol/water mixes), the PMPC layer can no longer take up solvent molecules (it does not want to be swelled by the solvent) and so collapses, becoming thinner. The layers we're using are very thin, only 30 nanometers (30 millionths of a millimeter) when dry, and we measure the thickness with a technique called ellipsometry. 

In the graph below, you can see solvent composition (as percentage of ethanol added to water) plotted horizontally and the thickness of the PMPC layer plotted vertically. In the pure solvents (either end of the graph), the layer has swollen to 140-150 nm from its dry thickness of 30 nm. In the mixed solvent, it is still slightly swollen but nowhere near as much. This is co-nonsolvency in action. 

Thickness of a surface-attached PMPC layer in ethanol/water mixes

Cartoon showing co-nonsolvency in surface-attached PMPC. R-OH represents alcohol (ethanol or isopropanol)

Why are we interested in PMPC co-nonsolvency? To be honest, the motivation for this paper was to check that co-nonsolvency is observed for surface-attached layers in the same way as free polymer. Polymers are such an important part of modern life that it is important to understand their properties fully. PMPC is finding applications in medical devices (as biocompatible coatings, amongst other applications) and it will be important to understand the solution properties to allow this material to be processed and used properly.

Finally, to answer the question posed in the title: if you are seeing co-nonsolvency, solvents are not solvents when you mix them together!

References
[1] Liquid Droplet Dispersions Formed by Homogeneous Liquid−Liquid Nucleation: "The Ouzo Effect". Vitale and Katz, Langmuir 2003, 19, 4105.
[2] Spontaneously Formed trans-Anethol/Water/Alcohol Emulsions: Mechanism of Formation and Stability. Sitnikova et al., Langmuir 2005, 21, 7083
[3] Measured and Calculated Solubility of Polymers in Mixed-Solvents - Co-non-solvency. Wolf and Willms, Makromolekulare Chemie - Macromolecular Chemistry and Physics 1978, 179, 2265
[4] Co-nonsolvency effects for surface-initiated poly(2-(methacryloyloxy)ethyl phosphorylcholine) brushes in alcohol/water mixtures. Edmondson et al., Langmuir, 2010, 26, 7216

Sunday, 7 November 2010

Inflating milk bottles to make plastic bags

When school students visit our Materials department, they are usually given a tour of the polymer processing facilities. They normally get to see processes like injection moulding and extrusion blow moulding. However, for the most recent visit the processing lab was busy, so I was given the challenge of demonstrating polymer processing in a lecture room!

First, I showed the students the fundamental stages of polymer processing (melting, shaping and cooling) using polycaprolactone, which can be melted with boiling water.

To demonstrate processing using a common polymer at real-world polymer processing temperatures, usually much higher than 100 C, I simply used a hot air gun (the type used for paint stripping, like a super-hot hair dryer) on the side of a 1-litre HDPE milk bottle. Within a few seconds the polymer melts, and changes from cloudy to clear.

Milk bottle before heating
After heating with a heat gun

If you blow into the neck of the bottle, you can inflate the melted portion into a bubble, which eventually bursts. It's fun! Here's a video of me inflating a bottle:


 The polymer in the skin of the bubble cools and freezes very quickly. Take care though, there will still may be some very hot melted polymer around the bottom of the bubble. Here's the finished 'product':


I get the students to feel the bubble - it feels exactly like a supermarket plastic bag. This is because these bags are also made out of HDPE, and also made by inflating molten polymer (in the blown film process). Inflation is also how the milk bottle was made in the first place - by extrusion blow moulding.

I've been doing this demo at the end of a lecture on glass transition temperature. To tie the two ideas together, I dunk the neck of the bottle in liquid nitrogen and smash it with a hammer:


The students have then seen the bottle in three states: solid/glassy, solid/rubbery and melted.

Monday, 1 November 2010

Using polycaprolactone for introducing polymer processing

Polycaprolactone is a polymer with a low glass transition temperature (-57 C [1]) which melts at 60 C [2], and so can be melted simply by dunking the polymer in hot water. You can see the polymer become clear as the crystalline regions melt, and you can feel that melted polymer still has strength and high viscosity (unlike a small molecule melting, like water) since it is made from entangled chains.

A great deal of polymer processing relies on having decent 'melt strength' and high melt viscosity. For example, in extrusion blow moudling a molten polymer tube is extruded, clamped into a mould and inflated with air. This process would not be possible if the viscosity and melt strength of the polymer were low - the polymer would either flow to the bottom of the mould, or burst on inflation!

Here's what the process of melting polycaprolactone looks like:


Solid polymer


Melting in boiled water


Melted polymer - the material becomes transparent

I bought mine under the trade name 'Polymorph' from Maplin in the UK, although it's available from other places and under other names (e.g. ShapeLock or Friendly Plastic).

I think the easily accessible melting temperature makes it ideal for teaching the fundamentals of thermoplastic polymer processing: plastication (melting), shaping, shape stabilisation (cooling).

Last week, I tried this out with some A-Level school students (16-18 years old). Before the session, I had a play around to come up with some ideas for things to make.

Roll the polymer between your hands into a tube, then shape round a big pen to make a spring. On cooling, the spring is nice and springy.
Again, after rolling into a tube, you can pull the ends apart to draw fibres – we managed to get it many metres long.
Once the fibre has cooled, you can stretch them further to demonstrate strengthening by fibre drawing, since the polymer is well above the glass transition temperature at room temperature.
By stretching a sheet you can form a film, although we found difficult to get large areas without holes.
Making linked rings is something that is quite difficult to do with 'normal' polymer processing techniques!
The students had fun playing with the material and seemed to grasp the relevance to real-world polymer processing. Apparently some of them were soon to be introduced to it as a 'smart material' as part of their A-Level studies


References
[1] Sivalingam et al., Polymer Degradation and Stability 2004, 84, 345-351
[2] Goldberg, Journal of Environmental Polymer Degradation 1995, 3, 61-67